Introduction to Timeline
Unity now contains a feature called Timeline which allows you to very easily record, edit and produce animated sequences that affect multiple objects. Timeline also allows you to play animations alongside everything else, making it the perfect tool to produce Cut-scenes.
Custom Playables
A great way to extend the functionality of the Timeline is to create a custom playable. One such use of this could be triggering dialogue to show to the player during a sequence. This could be extended by even pausing the playback of the timeline until the dialogue sequence has been completed.
This is not as simple as it sounds, thankfully a Unity produced tool exists on the asset store to quickly generate all the required classes. You can also produce the base classes yourself.
I will talk you through both using the Wizard and manually producing the required classes. I’ll also give examples here using the aforementioned idea of triggering dialogue.
How to
Using the Wizard
The Wizard can be downloaded into your unity project from the asset store, the package is called “Default Playables”. I highly recommend using this to create the base classes to begin and if needed read on to learn how to customised the PlayableBehaviour.
Using the included Wizard makes producing the base classes easy. From here the class to customise to add custom behaviour is the one which extends PlayableBehaviour. Read below to learn more about this class.
Manually Creating the Classes
The classes you will need to create extend from PlayableBehaviour, PlayableAsset and TrackAsset. They will all need to look similar to the examples below to give the functionality described in this post:
PlayableBehaviour
PlayableBehaviour is where the main functionality of the playable can be implemented. Here we add an override to OnPlayableCreate() to setup our playable. We also override ProcessFrame() to let us trigger our dialogue that we referenced in the inspector. Note that ProcessFrame() is called each frame that the clip is processed.
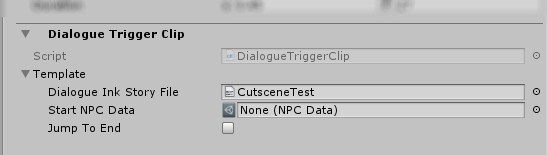
(The types NPCData and Story are custom and exist here due to being required for the shown code sequence. Story is a type that comes from Ink, a Narrative markup language that you can soon learn about on an up coming blog post.)
This example demonstrates showing a dialogue window when this playable is first processed. It also pauses the timeline playback when it first begins. It subscribes to an event to allow the timeline to continue playing once the dialogue has finished. If the Boolean JumpToEnd is true when we go to resume the Timeline then we jump to the end of this playable.
Note: We pause by changing the speed to not loose the current animation, currently (in Unity 2018.2) the Pause() method will cause the timeline to appear as it has stopped/ gone to the beginning.
The public fields in this class are accessible in Unity and can be given values in editor as long as the type is supported generally in the inspector.
PlayableAsset
The PlayableAsset type is required for a clip to exist on a track in a timeline. This needs to contain an instance of the PlayableBehaviour class that can be used later when returning a new playable. A new playable is returned for our new type by overriding CreatePlayable(). This is the most basic functionality that this class needs to allow you to add a new clip to the track.
Also note now the example also implements the ITimelineClipAsset interface which requires the definition of
1 | ClipCaps clipCaps. |
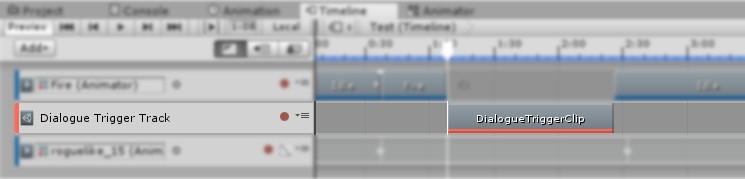
TrackAsset
This last class creates the track asset which creates a track where our clip can be placed. Here the track clip asset can be customized slightly. The example changes the colour of the clip (this can also be set in the wizard) via the TrackColor attribute.
Conclusion
These should now allow you to customise the timeline to allow you to trigger custom events by using tracks and playable. Playables are very complex and there are many other things that can be done with them and this is just one basic thing of many. If you have any other ideas, suggestions or feedback then leave a comment below. I am still learning the Timeline myself so if there are any issues please also comment or contact me on twitter.
WMolloy 12 April, 2019
Many thanks for posting as it is difficult to find any information about triggering Dialogue, least of all from Unity
Robert 12 April, 2019 — Post author
Glad to have helped! I had the same issue so I wanted to share my solution to the problem once I found how though many forum posts.
WMolloy 14 April, 2019
They could rename Unity to “many forum posts”. Thanks for the research on this and your other blog posts.
Herbacha 25 November, 2020
This is so helpful! I had a hard time finding the right way to do this, but your solution is just what I needed, and easy to implement. Thanks a bunch!